I used to spend a lot of time troubleshooting large Docker images, waiting for builds to complete, and worrying about wasted storage. It felt like no matter how carefully I structured my Dockerfiles, the images always ended up heavier than necessary. That all changed when I discovered SlimToolkit (formerly known as DockerSlim).
This tool analyzes a Docker image, identifies which files and dependencies are actually needed at runtime, and removes everything else. Follow this guide to see how SlimToolkit works, and the steps I used to shrink my Docker images without breaking anything.
SlimToolkit Simplifies Docker Image Optimization
SlimToolkit is an open-source tool that reduces Docker image size without requiring changes to application code or Dockerfiles. It removes the need for manual optimization steps, such as cleaning packages or rewriting build stages. Instead, SlimToolkit handles image optimization automatically and keeps the process simple.
When you run SlimToolkit on a Docker image, it performs a dynamic analysis by watching how the container runs. It tracks exactly which files, libraries, and dependencies the application touches during execution. Based on this data, it creates a new, optimized image containing only the required components. It keeps the original image unchanged, making the process safe and easy to reverse.
SlimToolkit works with existing images and supports Node.js, Python, Java, and Go, without requiring advanced Docker or Linux knowledge. It integrates seamlessly into most workflows, improving container security by removing unused tools and shells that attackers could exploit. Smaller images download faster, start quicker, and consume fewer resources, which is a massive win for CI/CD pipelines.
Setting Up SlimToolkit
Using SlimToolkit via Docker is the easiest method because it requires no local installation. As long as Docker is installed and running, you can start using SlimToolkit right away.
First, download the official SlimToolkit image using the following docker command:
docker pull dslim/slim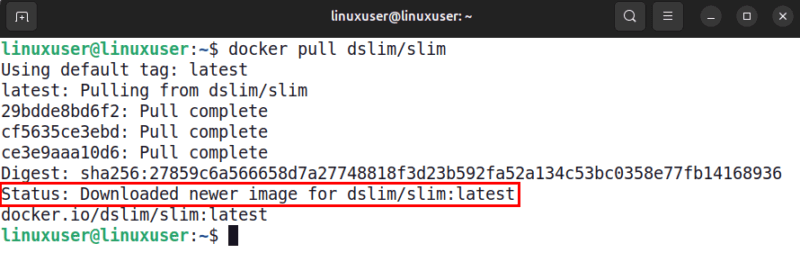
Running SlimToolkit requires mounting the Docker socket (/var/run/docker.sock). This gives the container permission to communicate with your local Docker engine to analyze and optimize images. Ensure you use only trusted official images.
Reducing Docker Image Size with SlimToolkit
To demonstrate the optimization process, we will slim a standard Nginx image. First, pull the official, latest Nginx image:
docker pull nginx:latest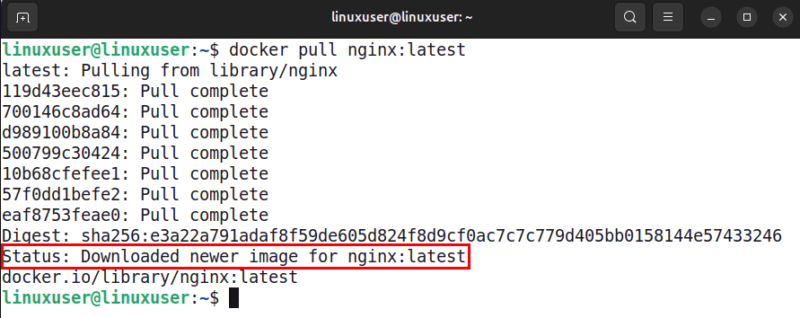
For standard applications like Nginx, you can run the build command directly. SlimToolkit checks which files the container actually uses and removes the unnecessary ones.
docker run --rm -v /var/run/docker.sock:/var/run/docker.sock dslim/slim build --target nginx:latest --tag nginx-slim:latest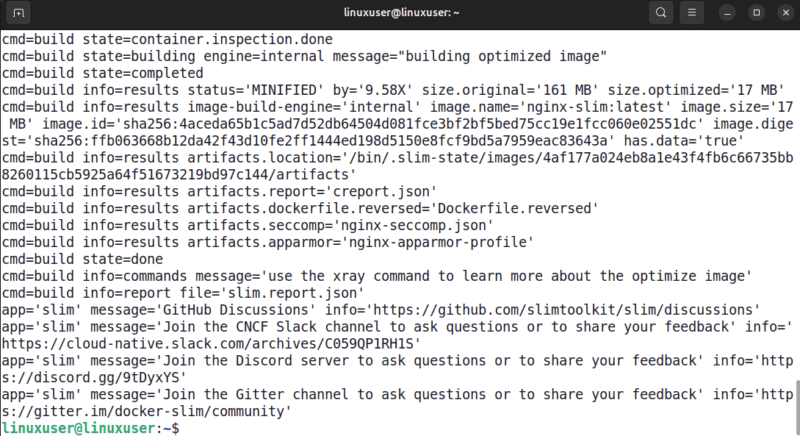
Some languages (like Python or Ruby) may have dependencies that aren’t triggered immediately during a standard probe. In those cases, create an “ignore.txt” file to tell SlimToolkit which folders to keep, like “/usr/local/lib/python3.11”. This prevents SlimToolkit from removing essential runtime dependencies.
You can run the command with a volume mount to include your preservation rules:
-v "$(pwd)":/target --preserve-path-file /target/ignore.txtCompare Size Difference: Original Vs. Slimmed Image
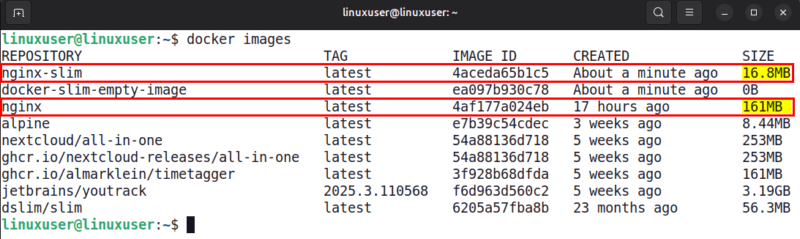
Once the process is finished, SlimToolkit saves the optimized image locally. You can compare the size difference between the original and the slimmed version with this command:
docker imagesYou’ll likely see a dramatic reduction.
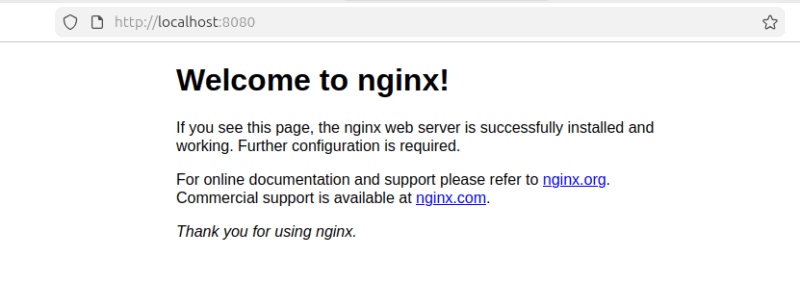
Finally, test your new optimized image to ensure it works as expected:
docker run -it -p 8080:80 nginx-slim:latest
Open your browser and navigate to http://localhost:8080. You should see the default Nginx welcome page, but running from a significantly smaller container footprint.
Other Useful SlimToolkit Commands
SlimToolkit provides a few key commands to help you analyze and optimize Docker images. Here’s a list of the most useful ones:
| Command | Description |
|---|---|
| slim build | Optimizes a Docker image by keeping only the necessary files and dependencies, reducing image size. |
| slim xray | Analyzes a Docker image and shows what’s inside, including files, layers, and dependencies. |
| slim lint | Checks Dockerfiles for errors to prevent build issues. |
| slim debug | Allows debugging a running container created from a slimmed Docker image. |
| slim profile | Collects information about a Docker image and outputs a JSON report for size and performance analysis. |
| slim merge | Merges two Docker images into a single image. |
You can also check all available SlimToolkit commands and their usage using the following command.
docker run --rm -v /var/run/docker.sock:/var/run/docker.sock dslim/slim slim help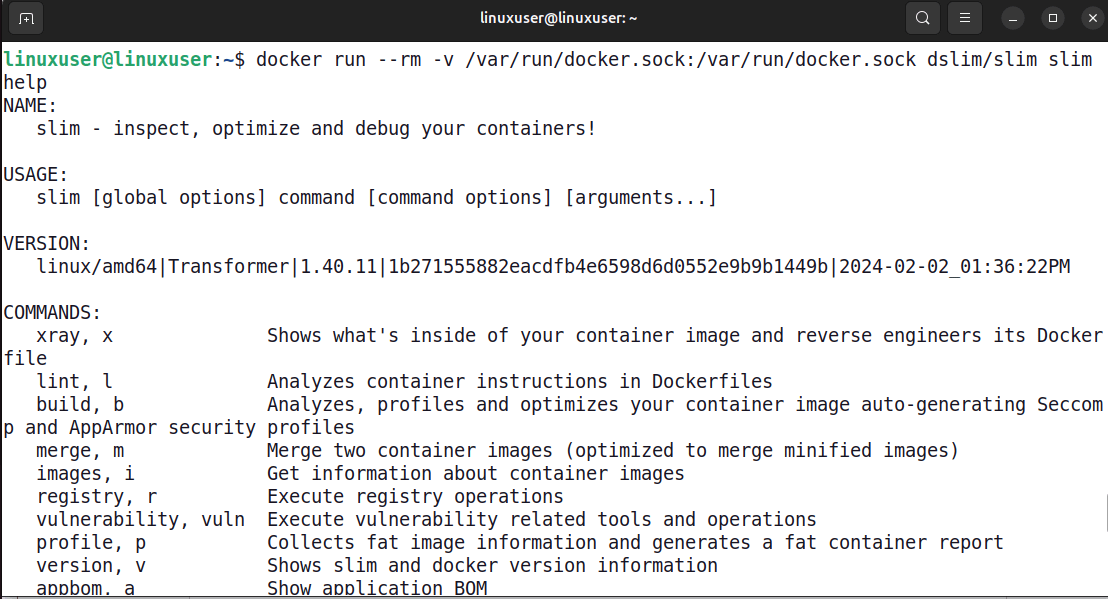
Limitations to Keep in Mind
While SlimToolkit helps reduce Docker image sizes, you should consider a few drawbacks:
- Slimming large images can take longer, so plan accordingly.
- Because the tool uses dynamic analysis, if a specific code path isn’t executed during the build process, SlimToolkit might think a dependency is unused and delete it. Always test your slimmed images thoroughly.
- It often removes tools like bash or curl to save space. If you need these for troubleshooting inside a production container, you must explicitly tell SlimToolkit to keep them.
Wrapping Up
Adding SlimToolkit to your workflow accelerates deployments, ensures consistent performance, and minimizes container bloat. It helps you build cleaner and more professional Docker images while keeping your original builds unchanged. Additionally, adopting the best Docker cleaning practices helps maintain efficient, well-organized containers over time.