
Have you ever wondered how you can change your account or user name in Windows? Maybe you made a mistake while typing your name or you’re transferring the device to someone else. Whatever the reason, it can be useful to know how to change your user name on your machine. In this guide, we will discuss multiple ways to modify your Windows account name. The following methods work on both Windows 10 and 11.
Also read: What Happens If You Don’t Activate Windows?
How to Change a Microsoft Account Name via Settings
If you’ve installed Windows 11 using your Microsoft account, then the name associated with the account will be visible on your machine. To change the name on your Microsoft account, follow these steps:
- Press Win + I to open Settings on your Windows device.
- Click “Accounts -> Emails & Accounts.”
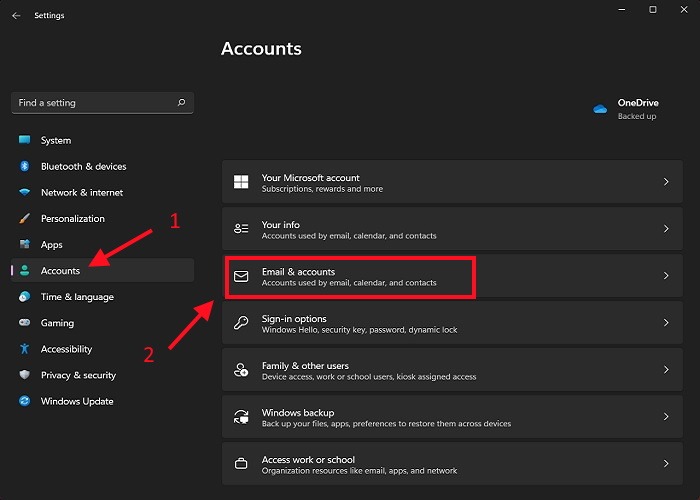
- Under the “Accounts used by other apps” section, locate your Microsoft account and click on the “Manage” button.
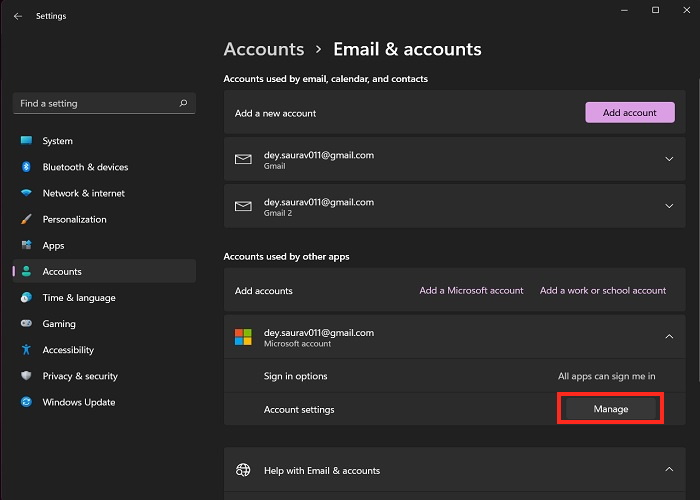
- Your Microsoft account page will open on a web browser. Sign in using proper credentials.
- Navigate to the “Your Info” tab, and click “Edit Name.”
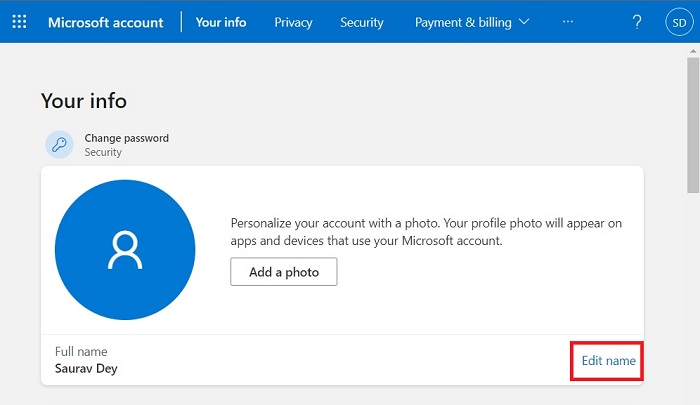
- You will have to complete a challenge to confirm you are not a robot trying to make the changes.
- Once you get passed that, do not forget to click “Save.”
- Finally, reboot the computer.
Technically you can change your name to anything you desire, but it might be a good idea to keep your personal information as private as possible. As such, you could use a pseudonym or an abbreviation of your name. Keep in mind that updating the Microsoft account information means it will change across all services provided by Microsoft, like Outlook, Microsoft 365, etc.
Tip: A Microsoft account is not really necessary if you want to try out Windows 11, and you can check our guide that shows you how to approach the matter.
Also read: 6 Ways to Clean the Windows Registry
How to Change Local Account Name via Control Panel
You can also change your account name on Windows 11 through Control Panel. However, this method is only effective for local accounts created without a Microsoft account. It won’t work on Administrator accounts and if your local account is associated with a Microsoft account.
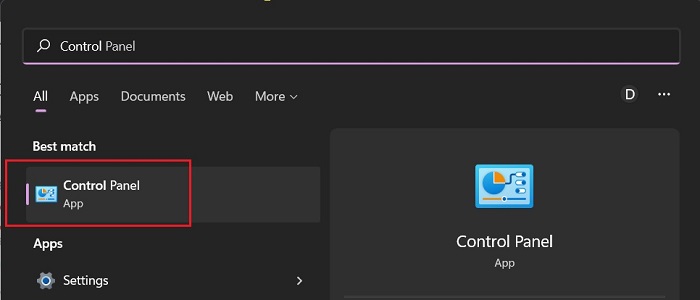
- Click on the magnifying glass icon in your Taskbar.
- Search and open the “Control Panel” on Windows 11. Alternatively, there are other ways to access Control Panel on Windows.
- Navigate to the “User Accounts” section and click on “Change Account Type” under “User Accounts”.
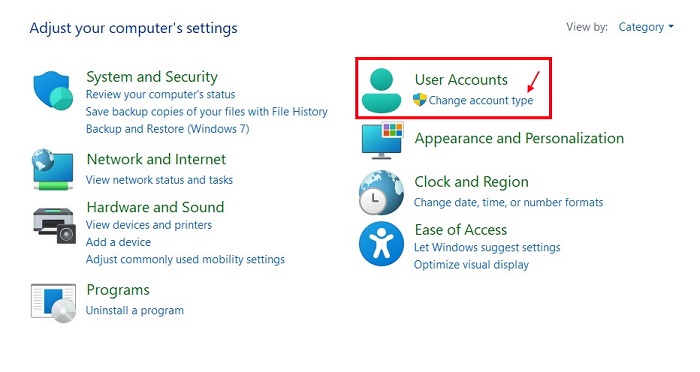
- Choose the desired local account to modify and click the “Change the account name” option.
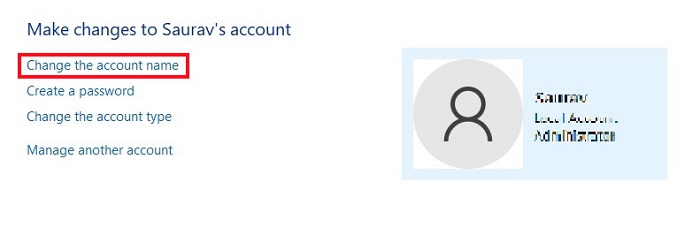
- Provide a new account name and confirm it.
- Click the “Change name” option to save the modification.
As you can see, the steps are pretty simple. After executing these steps, you can sign in to your account. The modified name will be displayed.
Also read: 5 Ways to View Saved Wi-Fi Passwords in Windows
How to Change Local Account Name via Netplwiz
This is an alternate method to change the local account name on Windows 11 via the legacy user manager. Here’s how to change your account name on Windows 11.
- Press Win + R to bring up the “Run” dialog box.
- In the box, type “netplwiz” and click “OK.”

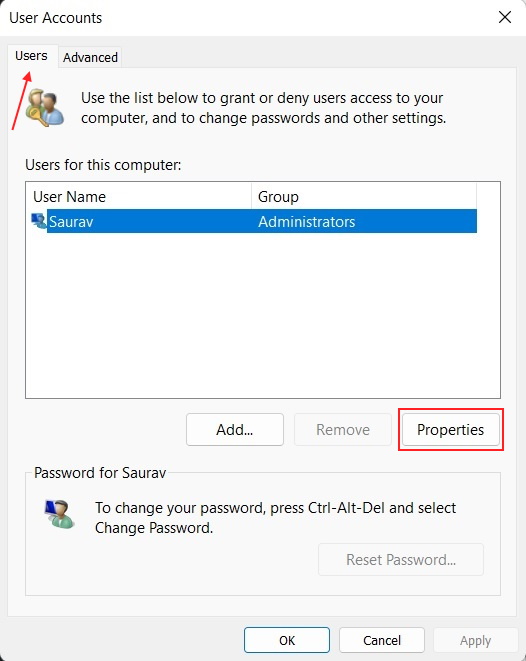
- It will launch the legacy account manager tool. Select the “Users” tab.
- Now, choose the account you want to modify. Select the “Properties” option.
- From here you can change the “User Name” info and so change the nickname for you account.
- Next, in the “Full Name” section, go ahead and provide your details. However, some people prefer to stick with nicknames. If that’s the case with you, do not type anything in the “Full Name” section.
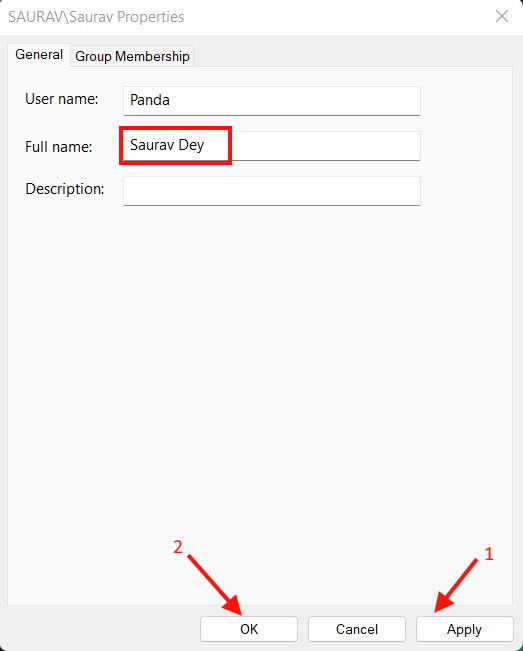
- Click the “Apply” button.
- Finally, click “OK” and then click “OK” again.
The changed name will reflect on the “Sign-in” screen. Also, if you use this tool to change the name of your Microsoft account, the cloud settings will overwrite the modified information.
Also read: How to Set up and Use a RAM Drive in Windows
How to Change Local Account Name via Computer Management
In this method, we will change the account name on Windows 11 through the Computer Management app. Here are the steps for it.
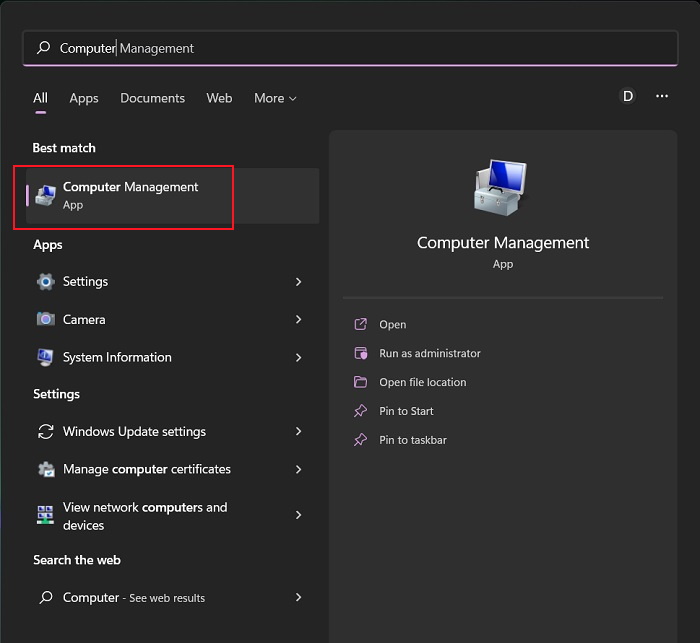
- Click on the magnifying glass icon in your Taskbar.
- Type and select “Computer Management.”
- Expand the “System Tools” option. Then, double-click “Local Users and Groups.”
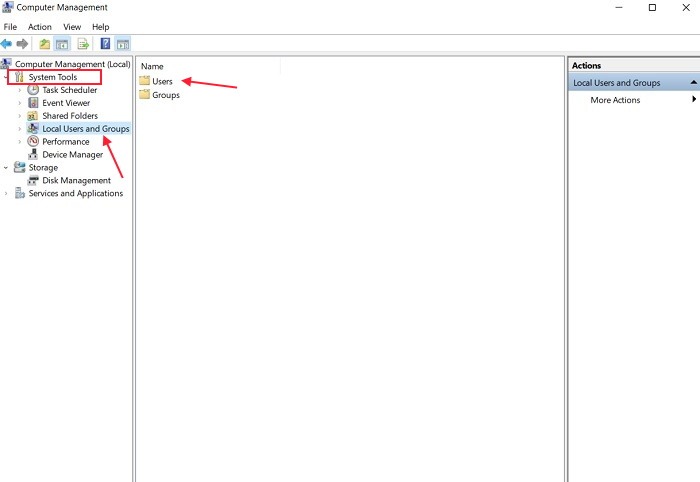
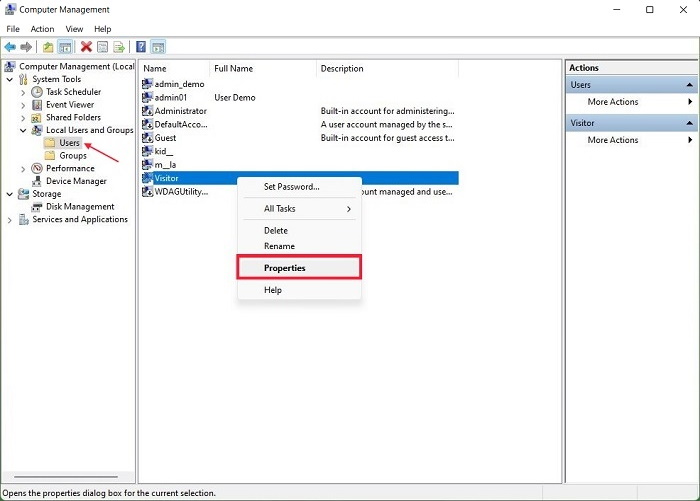
- After that, click “Users.” Then, right-click the desired account and choose the “Properties” option.
- Navigate to the “General” tab.
- Type and confirm the new name for the account in the “Full Name” section.
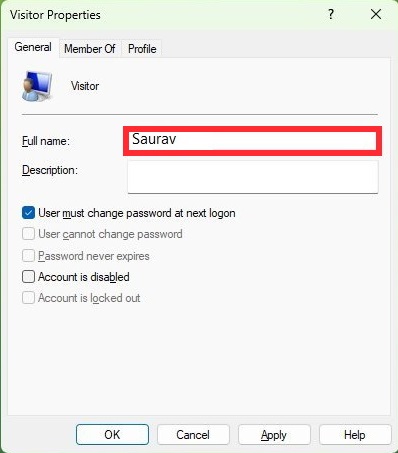
- Then, go ahead and click “Apply,” followed by clicking “OK.”
As usual, the changed name will appear on the “Sign-in” page.
Also read: How to Connect a Laptop Screen as External Monitor in Windows
How to Change Local Account Name via Command Prompt
You can also change the user name of a local account on Windows using the Command Prompt.
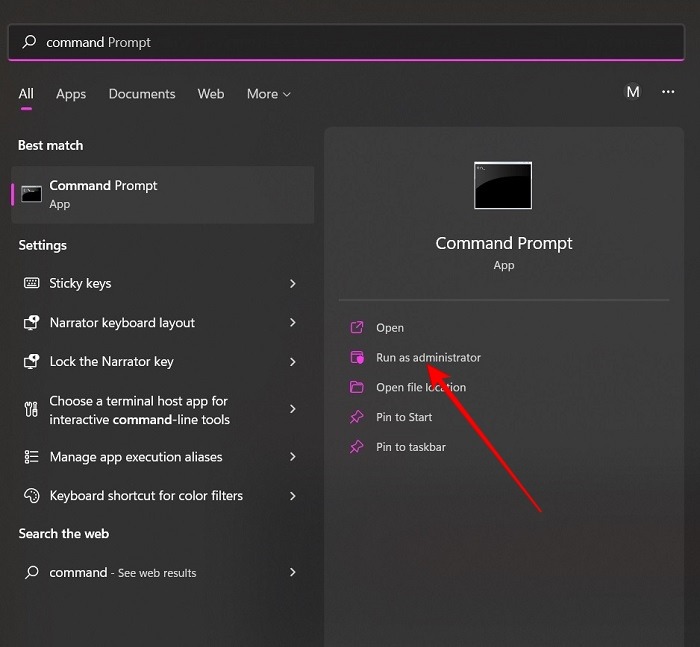
- Type “Command Prompt” in the search bar.
- Right-click the Command Prompt option, and choose “Run As Administrator.”
- The cmd window will open. Type the following command.
wmic useraccount where name="Current User Name" rename "New User Name"
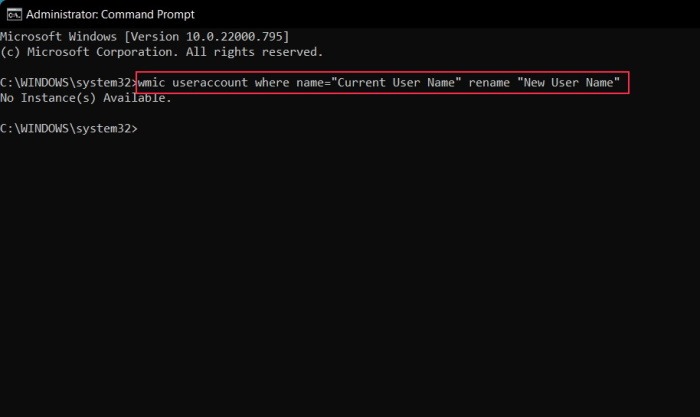
Note: The “Current User Name” should be replaced with the name of the account you want to change. The “New User Name” should be replaced with the new name for the account you wish to assign.
Also read: How to Sort Folders by Size in Windows
How to Change Local Account Name via Windows PowerShell
This method is more or less similar to the previous one. Instead of Command Prompt, you will be using Windows PowerShell to change the user name of a local account on Windows.
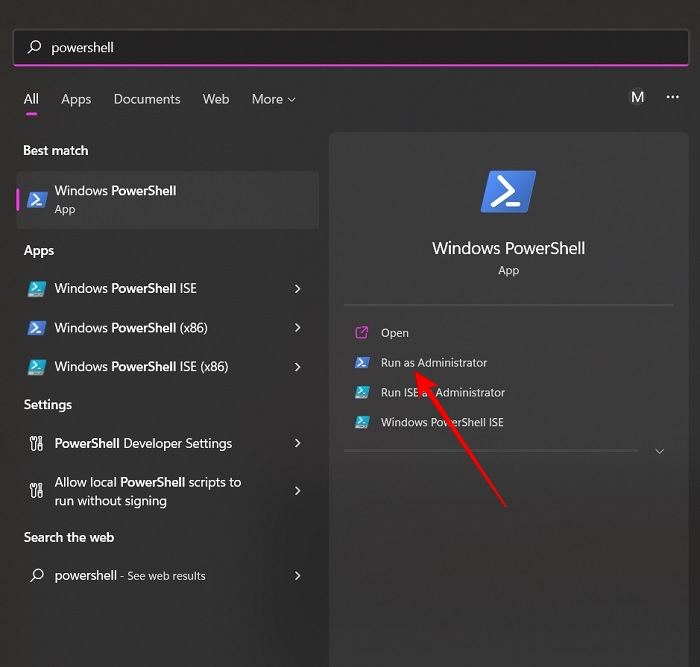
- Type “Windows PowerShell” in the search box.
- Right-click the search result, and select the “Run As Administrator” option.
- Windows PowerShell window will open. Type the following command.
Rename-LocalUser -Name "Current Username" -NewName "New Username"
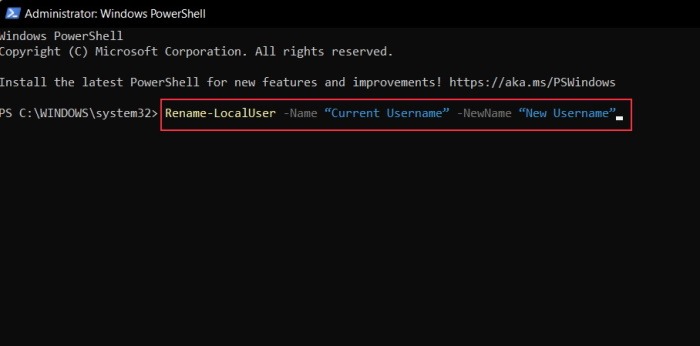
Note: Again, replace both “Current Username” and “New Username” accordingly to get the desired results.
Also read: How to Use Rufus to Create a Bootable Flash Drive
Frequently Asked Questions
Is it possible to rename your profile folder inside the “Users” folder?
While multiple methods are available to change the name of your Windows 11 account, renaming your profile folder inside the “Users” folder in the C:\ drive is a pretty risky affair, as it involves accessing the security identifier (SID) and making changes to the Registry. Still, if you still want to change the name displayed on your profile folder, we recommend creating an entirely new account and transferring all the information to the new profile.
Can I rename the Administrator account?
Yes, it is possible to change the name of the Administrator account on Windows 11. You need to go through the following steps for it. Open Computer Manager like we showed you above then navigate to “Local Users and Groups -> Choose Users -> Right-click on the Admin account -> Select Rename”. Type a new name that you find suitable. The only requirement is that you need to be the Administrator to do this.
How do I remove my Outlook account from Windows 11?
If you want to remove your Outlook account from Windows 11 and leave only the Microsoft one, here’s what to do. Open Outlook on your device and click on “File -> Account Settings”. Click “Account Settings” from the drop-down menu. Choose the account in question and press “Remove”.
Image credit: Unsplash. All screenshots by Saurav Dey & Alexandra Arici