Have you ever tried to drag a file to your Mac’s Bin, only to receive an error message? Maybe the file is in use, locked, or you don’t have permission to edit the file in question. Here we cover all the ways you can delete files on your Mac that won’t delete and refuse to be moved to the bin.
Also read: 3 Ways to Fix the Service Battery Warning on Mac
“File in Use” Error
You cannot delete a file if an application is using it! If your Mac is displaying the “file in use” error, you need to figure out which application has a hold over the file and close that application.
If you only have a handful of applications open, this may be as simple as shuffling through the various application windows. Alternatively, you can see a list of all active applications in the “Force Quit” window, as shown below:
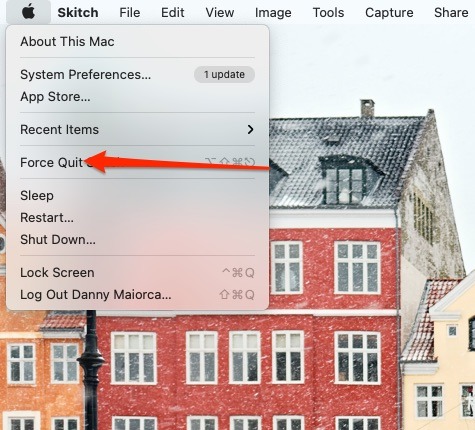
1. Click the “Apple” logo in your Mac’s menu bar. You’ll find this in the top-left corner of your computer screen.
2. Select “Force Quit.”
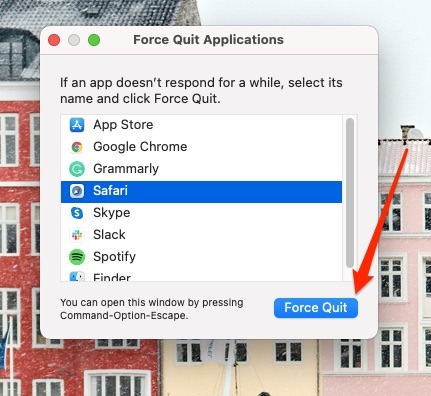
You can now review all the apps that are running on your Mac.
If you spot an app that could be responsible for the “File in use” error, you can close that application normally. Alternatively, you can select the application in the “Force Quit” pop-up, then click the “Force Quit” button.
Note that if you opt for the latter, you’ll lose any unsaved work within the application.
Once you’ve closed the offending application, try deleting the file again. It should now vanish without any issue!
Also read: How to Hide Files, Folders and Desktop Icons on Mac
2. The File Is Locked
When a file is locked, you’re unable to make any changes to that file. This includes deleting it.
You’ll need to unlock this file before deleting it:
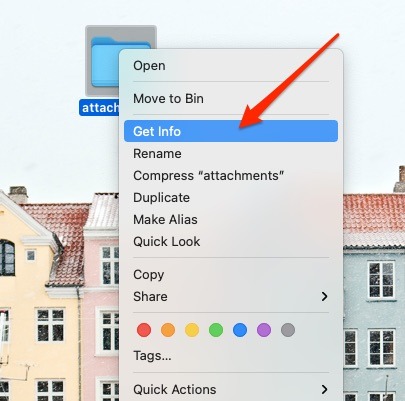
1. Ctrl+ click the file you’d like to unlock.
2. Select “Get Info.”
3. Click to expand the “General” section.
4. Find the “Locked” checkbox and deselect it.

Alternatively, you can unlock a file using your Mac’s Terminal.
1. Open the Terminal (Applications -> Utilities -> Terminal) and type the following command:
chflags nouchg /path/to/file
When the file unlocks, you can go ahead and delete the file, as you normally would.
3. You Don’t Have Permission to Edit the File
Sometimes you may hit the “Delete” key only to encounter a “You don’t have permission to edit this file” message.
Thankfully, you can give yourself permission:
1. Ctrl+ click the file in question.
2. Select “Get Info.”
3. Click to expand the “Sharing & Permissions” section. You’ll see a list of all the user accounts registered with your Mac.

4. To give yourself permission to edit this file, click the little padlock icon.
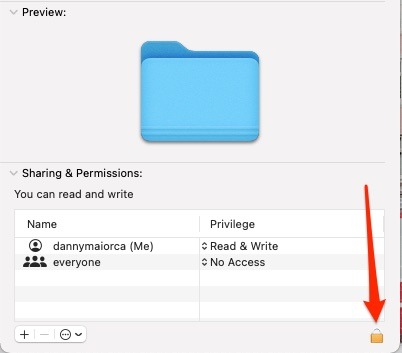
5. When prompted, enter your username and password.
6. Find your username in the list, click the accompanying set of arrows, then select “Read & Write.”

You should now have permission to edit this file, including dragging it to the Bin!
Also read: How to Fix Mac Wi-Fi Problems and Dropped Connections
4. Using Third-Party Apps
If all else fails, you may have a little success using third-party apps to get rid of files that won’t delete on your Mac.
One which you might be worth checking out is Cleaner One, which allows you to easily remove files you want to get rid of on your Mac.
Alternatively, you may want to consider WeClean Pro instead. Besides deleting files that won’t delete, you can also use this app to sweep away anything that’s taking up unnecessary space on your computer.
5. None of the Above Fixes Work? Try Force Delete
If all else fails, you can force-delete the file using a Terminal command. Just be aware that force-delete doesn’t send the file to the Bin – it permanently and immediately deletes the file in question. If you realize you’ve made a terrible mistake, there’s no way to recover the file.
This technique can also delete files you wouldn’t normally be able to delete – and sometimes Apple has a very good reason for protecting certain files! Force-delete is a useful technique but should be used with caution.
To force-delete a file, open your Mac’s Terminal. You can do this by clicking on the magnifying glass in the top right of your toolbar before tying “terminal” in the search bar and clicking on “terminal.app.”
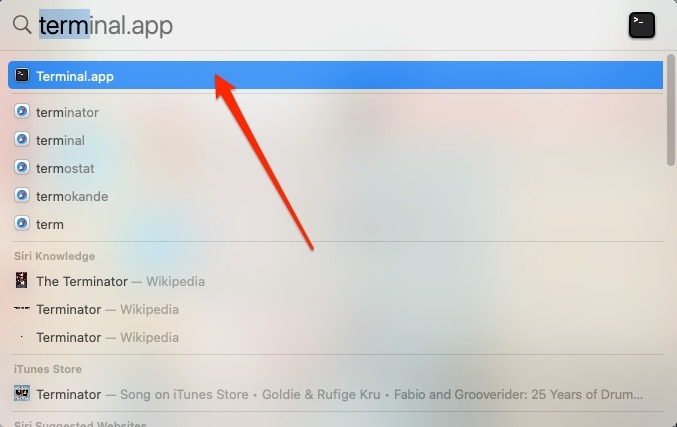
When you’ve opened your Mac’s Terminal, type the following command:
rm -f /path/to/file
Taking Out the Trash
Have you managed to banish a file to the Bin, but now it’s stuck there, refusing to let go?
If you’re getting an error message every time you try to empty the Bin, there are a few tricks you can try.
1. Close all applications
An application may be using one of the files inside your Mac’s Bin.
You can resolve this issue by selecting the “Apple” logo in your Mac’s menu bar, choosing “Force Quit … ” then closing the application in question.

If you’re unsure which application is interfering with the “Empty Bin” command, you can always restart your Mac, which will close all applications.
When your Mac restarts, make sure you empty the Bin before launching any applications!

2. Make sure all files are unlocked
If the Bin contains a file that’s locked, this can prevent you from emptying this successfully.
If the Bin only contains a handful of files, you may be able to check each of these files manually by Ctrl+ clicking each file, then selecting “Get Info.” If you discover a locked file, you can unlock it using the steps listed earlier in this article.
3. Force-delete stubborn files
If you suspect that a particular file may be preventing you from emptying the Bin, you can forcefully delete this file while it’s inside:
1. Open your Mac’s Bin.
2. Ctrl + click the file you believe may be causing the problem.
3. Select “Delete Immediately.”
Rinse and repeat for any other files you believe may be affecting your ability to empty the Bin.
Also read: How to Add and Remove Kexts from macOS
A Side-Note on Securely Emptying Your Mac’s Bin
Apple used to have a feature that would allow you to “securely” empty your computer’s Bin. However, the company has removed it, meaning you’ll now need to use third-party software.
One of the most popular options for securely deleting files on Mac is Permanent Eraser, which does exactly what it says – permanently erases your files without leaving a trace.
As an alternative to Permanent Eraser, the Mac Optimizer Pro Data Shredder might take your fancy instead. While you’ll have to pay for a full version, you can also give the free edition a try to get what you need done.

Frequently Asked Questions
1. Is it safe to force quit apps on your Mac?
Yes. However, you may lose progress on any work you haven’t saved.
2. Can I access a file after deleting it from my Mac?
Not from your computer, no. To access a file after deleting it, you’ll need to do so from somewhere else you’ve stored it – such as a hard drive or cloud system.
3. Does deleting a file mean that I delete everything in it?
Yes. Once you’ve deleted a file, everything in it will go. This is also the case if you delete a folder with multiple files.
Wrapping Up
Now that you have learned how to delete Mac files that won’t delete initially, it is also good to delete an autosave file version to free up storage space. You should also locate and delete duplicate files on your Mac. Speaking of locating files, you can pinpoint the location of any file by revealing its file path.
And now, moving on from deleting files to creating them, let’s see how to create a new blank text file in any folder on your Mac.