The Android Debug Bridge (ADB) is a command-line tool to interact with your Android device from your computer. ADB commands enable you to perform a wide range of tasks, including some that would be difficult or even impossible to achieve without ADB. In this article we cover the essential ADB commands that every Android user should know.
Also read: How to Install Windows from Android
Enable Developer Options on Android
Before your computer will recognize your Android device to use ADB commands, you have to enable Developer Options and USB debugging on your device. These aren’t enabled by default.
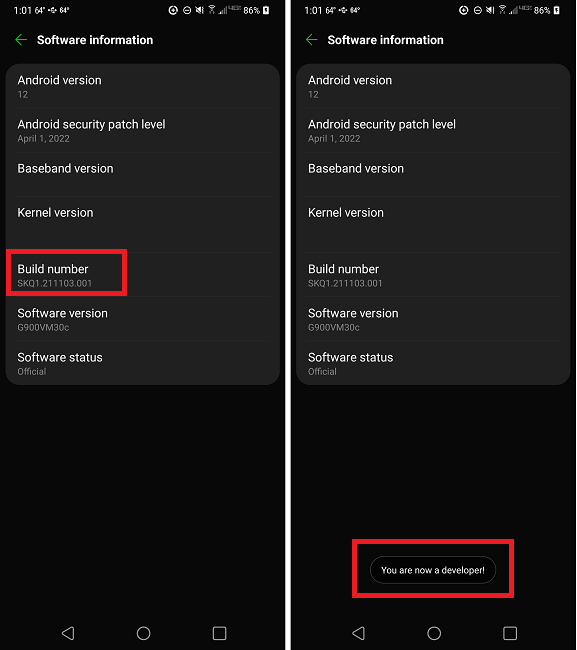
- Open “Settings.”
- Tap “System.” On older Android devices, look for “About phone.”

- Tap “About phone.”
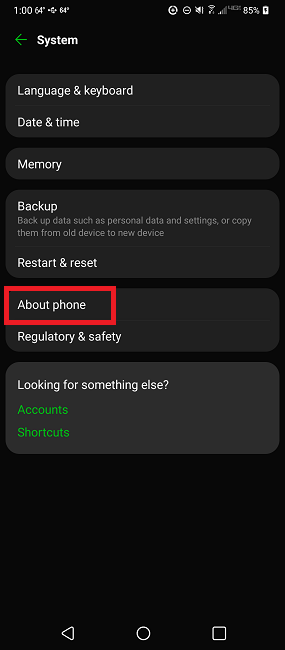
- Tap “Software information.” On older Android devices, look for “Build number” and skip to the next step.
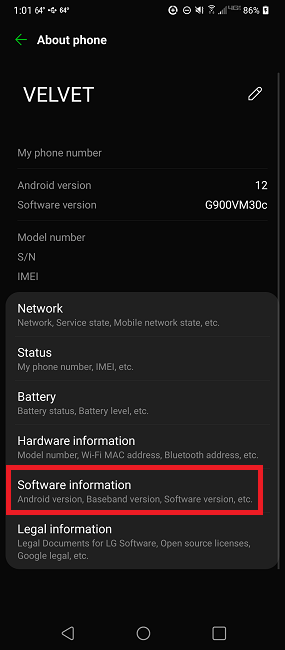
- Tap “Build number” at least seven times until you see a message saying “You’re now a developer” at the bottom of your screen. If you’ve already enabled Developer Options, you’ll see “No need, you’re already a developer.”
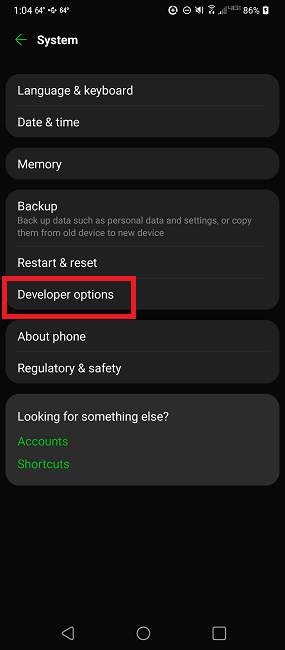
Once you’ve enabled Developer Options, you also need to enable USB Debugging using the following steps:
- Open “Settings.”
- Tap “System.”
- Tap “Developer options.”
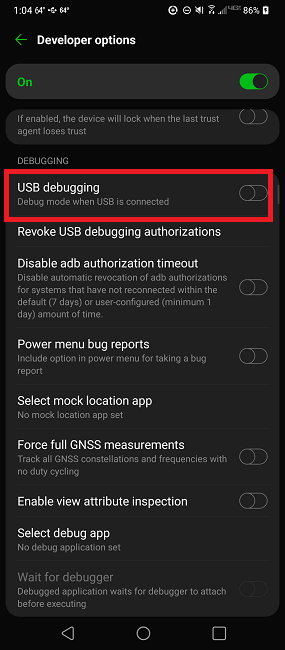
- Toggle “USB debugging” to On.
- Confirm you want to enable it.
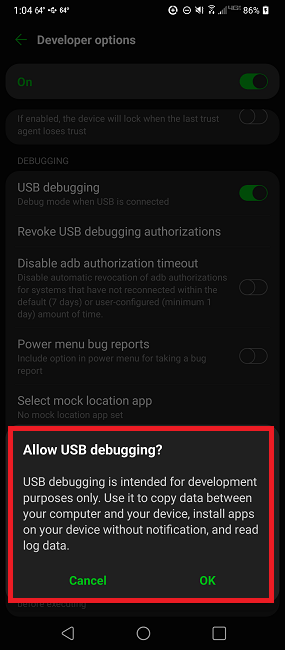
Now you’re ready to set up ADB.
Also read: How to Share Files Between Android and Windows on Your Network
How Do I Set Up ADB?
ADB is distributed via the Android SDK Platform-Tools package. If you have Android Studio installed on your computer (find out how to install Android Studio), then you can install ABD via the SDK Manager:
- In the Android Studio toolbar, select “Tools -> SDK Manager.”
- Find the “Android SDK Platform-Tools” package and select it.
- Click “OK.”
Android Studio will now download the SDK Platform-Tools package. Alternatively, you can download the standalone Android SDK Platform-Tools package.
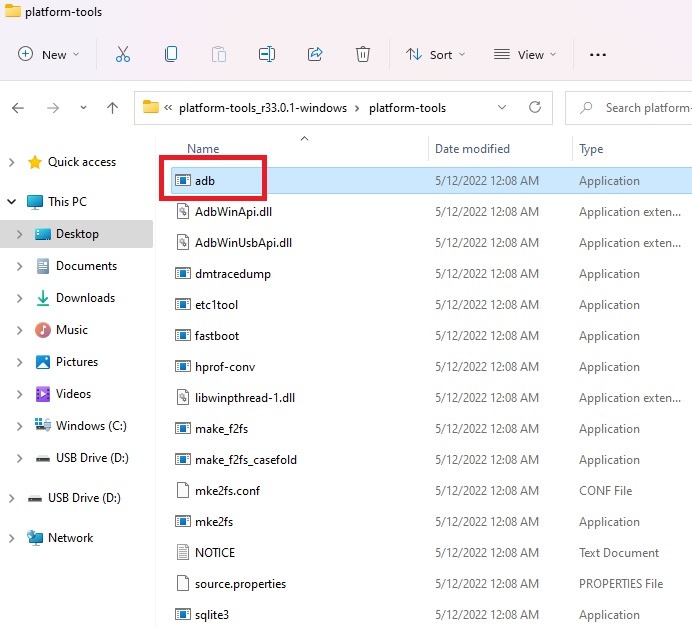
To run ADB, navigate to the “platform-tools” folder you just downloaded. This folder should contain an “adb” program.
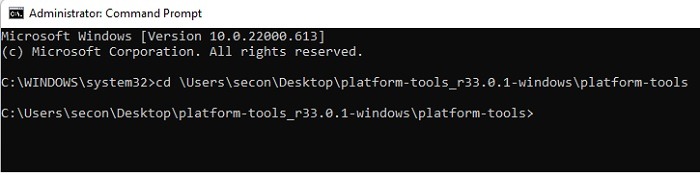
You’ll need to open a new Terminal or command prompt window and change the directory so it’s pointing at this ADB program. For example, my command looks like this:
cd \Users\secon\Desktop\platform-tools_r33.0.1-windows\platform-tools
You’re now ready to run ADB commands!
Also read: 10 of the Best Android Emulators for Your Desktop
1. Show Connected Devices
When using ADB commands, you’ll need to ensure the device you want to interact with is actually connected to your computer. Although ADB has improved significantly in recent years, ADB can sometimes still struggle to “see” connected smartphones or tablets.
The following command will ensure that ABD is ready to communicate with your Android device:
adb devices
After entering this command, the serial number of your connected devices should appear in the command prompt/Terminal.
2. Reboot Your Device
This command reboots your device in normal mode. You’ll typically run this command after you’ve flashed something to your device and need to reboot.
adb reboot
This command can also be useful if you’re encountering issues with your Android device – for example, if your smartphone suddenly becomes unresponsive.
Also read: How to Install Android Apps From Your PC
3. Reboot into Recovery
Android devices have a recovery mode, which is a special bootable partition. If you’re encountering issues with your Android device, then you may be able to fix these problems by booting into recovery mode.
If you wish to reboot your device into recovery mode, then you can issue the following command:
adb reboot recovery
Your device will power down and then reboot into recovery mode. If you’ve flashed a custom recovery on your device, this will load instead of Android’s stock recovery.
4. Reboot into Bootloader Mode
The bootloader is the first thing that runs when you boot up your Android device. If you want to unlock the bootloader, reboot into recovery mode or perform other rooting-related tasks, then you’ll need to boot your device into bootloader mode.
adb reboot bootloader
5. Reboot into Fastboot
Android’s fastboot mode helps you flash custom recoveries as well as custom ROMs. Instead of going into bootloader and then choosing fastboot, you can launch directly into fastboot mode using the following command:
adb reboot fastboot
6. Send File to Your Device
There are plenty of applications dedicated to helping you transfer files between your computer and your Android device, such as OpenMTP. However, if you just want to transfer the occasional file, then downloading an entire application may feel like overkill.
The adb push command lets you send files to your Android device. You just need to specify the source location of the file and the destination where you want to send that file:
adb push Source Destination
For example, you may have a file called “myapplication.apk” that’s stored on your Desktop that you want to push to your smartphone’s “downloads” folder. In this scenario, your ADB command may look something like this:
adb push /Users/secon/Desktop/myapplication.apk /sdcard/downloads
The file will now be pushed from your laptop or computer and into the “Downloads” folder of the attached smartphone or tablet.
Also read: How to Sign Out of Google on Mobile and Desktop
7. Get Files from Your Device
We’ve looked at pushing files, but it’s also possible to pull them. This ADB command lets you pull a file from your Android device so that it appears on your connected laptop or computer.
You just need to specify the file you’re pulling and the location where that file should be stored on your computer:
adb pull FileLocation Destination
Let’s imagine that we want to pull a “myphoto.jpg” file from our smartphone or tablet and save it to our Desktop. The command would look something like this:
adb pull /sdcard/myphoto.jpg /Users/secon/Desktop
8. Install an App on Your Device
When you download an application from a source other than Google Play, you may have to push that application from your laptop to your smartphone or tablet as an APK file.
To install an APK file, you just need to specify that APK’s location:
adb install APKLocation
For example, to install an APK named MTE.apk that’s stored on the Desktop, you’d run the following command:
adb install /Users/secon/Desktop/MTE.apk
This APK file will then be pushed to Android and installed automatically.
If you want to update an existing app, use the following:
adb install -r APKLocation
Also read: How to Turn an Amazon Fire Tablet into a Stock Android Device (Almost)
9. Remount the System
Sometimes you may need to remount the entire system of your device. This puts the “/system” partition into writeable mode, and it should be run before pushing any files to this partition. Note that it’s only possible to remount the system on a rooted Android device.
To remount, run the following command:
adb remount
10. Sideload System Updates
Tired of waiting for system updates to roll out to your device? Download them manually and then sideload them onto your Android device via the ADB sideload command. You can find updates directly from Android and your device manufacturer.
As a warning, if you’re trying to install updates on an older device, it may not work. For instance, if you’re trying to update an Android 7 device to Android 12, this could brick your device as the older device might not be able to handle the newer and more robust operating system.
Once you’ve found your update, use the following:
adb sideload FileLocation
Also read: How to Install TWRP Recovery on Android without Root
11. Create and Restore a Backup
While there are plenty of backup apps available, you can create your own Android backup by using the backup command. This doesn’t guarantee that all app data will be backed up, but any files stored on your device, apps, files stored on an inserted SD card, and system apps can be backed up. This is ideal if you need to restore your Android device at any point.
The basic backup command is:
adb backup -f backupfilename.ab
This will create a backup in the current directory. You can move the file wherever you want once the backup is complete. This backup will only back up certain apps, system data, and files. For a full backup, use the following:
adb backup -apk -obb -shared -all -system -f backupfilename.ab
Full backups can take a while to complete depending on how much data is stored on your device.
Whenever you want to use the backup to restore files to your device, use the following:
adb restore backupfilename.ab
Make sure the backup file is in the same directory as the adb tool. Otherwise, enter the path for the backup file in addition to the name of the file.
If you just want to back up photos, try apps that provide you with automatic free and low-cost photo storage. Or you can just connect your device to your computer and manually move them from your DCIM and/or Pictures folders. You can also easily transfer contacts between devices. If you want to back up your app game data, use this method to sync your game progress between devices.
Also read: What Is AppFlash on Android and Do You Need It?
Frequently Asked Questions
Is there an ADB command to remove bloatware from my device without rooting it?
The easiest way to remove bloatware is to uninstall the app from within your device’s settings. Go to “Settings -> App Manager -> App Info.” Select the app and tap Uninstall or Disable.
For those that can’t be removed that easily, use these steps to remove bloatware via ADB commands.
Why doesn’t my computer recognize my Android device?
Ensure you’ve turned on Developer Options and USB Debugging your device. If not, your computer likely won’t recognize your Android device when using ADB commands.
Also, install the latest version of Android SDK Platform if you’re using an older version. An outdated version can result in errors.
It’s also possible you haven’t navigated to the correct directory when using ADB. You must navigate to the “platform-tools” directory in Terminal or command prompt.
Finally, verify that your USB cable is working and compatible with your device. For instance, a third-party cable I use for charging doesn’t won’t let my Android device show up on my Windows PC. I have to use the cable that came with my phone in order to use ADB commands or transfer files manually.
Should I ever use alternative ADB tools?
While there are other ADB tools available, many of these don’t let you use all available ADB commands. Even worse, many also include malware. Although the Android SDK Platform might be more than you actually need, it’s the safest and most reliable option. Plus, it’s constantly updated, so you know you always have a version that works with the latest versions of Android.
Image credit: Denny Müller