No matter how well you take care of your computer, sometimes, it will just crash and you often have to pull off the plug to restart the computer. When such crashes happen, there is a chance that your filesystem will get corrupted or damage. It is advisable to do a filesystem check regularly to make sure that it is running properly and free of error.
In Linux (and Mac), there is this powerful command “fsck” that you can use to check and repair your filesystem. “Fsck” stands for “File System Consistency checK”.
The usage is very easy. Open a terminal and type:
fsck /dev/sda1
This will check the sda1 partition.
Note: fsck cannot be used on a mounted partition. If you do so, there is a high chance that it will damage the filesystem.
To check your Home folder that resides on another partition, say sda2, use the following commands:
umount /home
fsck /dev/sda2
Note: you will need root/superuser permission to run the “fsck” command.
You can also use “fsck” to check external drive, such as your thumb drive or SD card. For example:
umount /dev/sdb1 #thumb drive
sudo fsck /dev/sdb1
If you are not sure of the partition number, you can use the command
sudo fdisk -l
to list out all the partitions in the system.
Advanced Usage
There are a few parameters that you can add to “fsck” to make it more powerful.
Auto repair filesystem when errors are detected
During the filesystem check, if errors are detected, you can get “fsck” to auto repair the filesystem with the -a flag. For example:
fsck -a /dev/sda1
Similarly, using the -y flag can get the job done as well:
fsck -y /dev/sda1
Check all filesystems in one run
If there are several filesystems in your computer, you can get fsck to check all of them at the same time with the -A flag.
fsck -A
What it will do is to grab all the filesystem entries from /etc/fstab and scan them for errors. You can use it together with the -R and -y flag to prevent it from scanning the root filesystem and fix all errors, if there is any.
fsck -AR -y
Exclude check on mounted filesystem
As mentioned earlier, fsck cannot be run on a mounted filesystem. If you are using the -A flag to scan all the filesystems, and some of them are mounted, you might damage those filesystems. A way to overcome this is to use the -M flag to prevent it from checking mounted system.
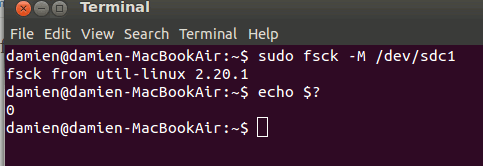
For example, running the command
fsck -M /dev/sdc1
returns nothing and a return code 0 (which means “no error”). No scan was done at all since all the filesystems are mounted.
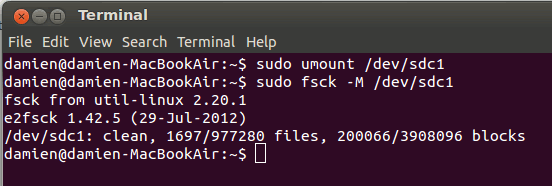
However, if I unmount the external thumb drive and run the command again, it will then perform the scan and return the output:
Specifying the filesystem type
There are times when you just want to check filesystems of a specific type, say ext2. You can make use of the -t flag to specify the filesystem type to check. For example, the command
fsck -t ext4 /dev/sdc1
will scan the external drive only if it is in the ext4 format. Alternatively, you can combine with the -A flag to scan all filesystems of the specific type:
fsck -A -t ext4 -y
Force fsck to run everytime during bootup
By default, Ubuntu will run fsck after every 30 bootups, but if you want the system to to do a “fsck” check everytime it boots up, all you need to do is to create an empty file call “forcefsck” and place it in the root folder. This will notify the system to do a “fsck” check everytime during boot up.
sudo touch /forcefsck
To change the checking frequency, you can make use of the command “tune2fs“.
The following command instructs the system to run “fsck” after every 30 boot up.
tune2fs -c 30 /dev/sdaX
You can also specify number of days instead of boot up:
sudo tune2fs -i 10d /dev/sdaX
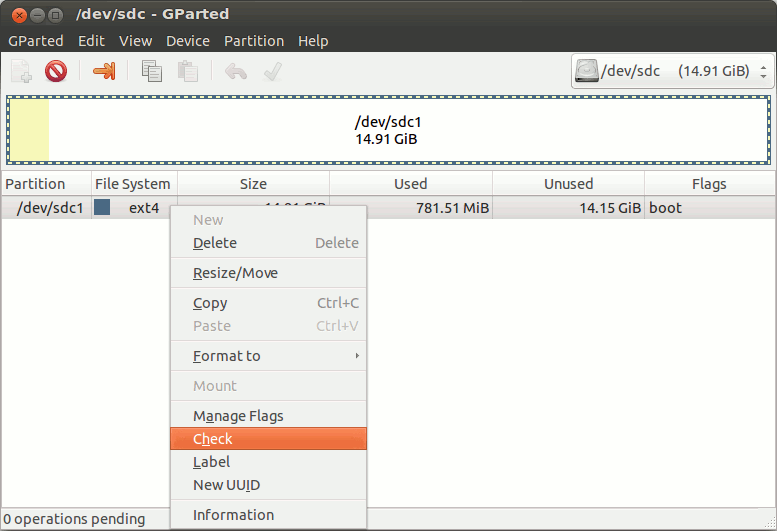
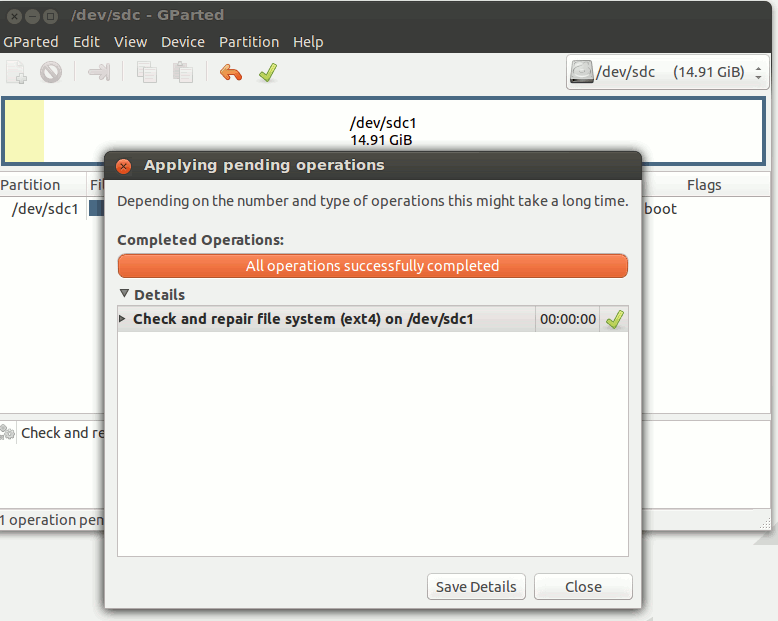
Using fsck with a GUI
As you can see, fsck is mainly a command line tool. If you need a GUI for that, GParted comes with a feature that allows you to check your filesystem.
First, install GParted:
sudo apt-get install gparted
Next, open GParted and select the filesystem you want to check. Right click on it and select “Check”.
Conclusion
fsck is a useful command that can check your filesystem for errors and fix them automatically. Most of the time, you won’t have to bother with it as your system will usually run it regularly during boot up to make sure everything is working fine. However, when your filesystem get corrupted, this is the easiest way to find out what happen and fix it.
Note: fsck is also available in Mac.
Image credit: Testing Connections by BigStockPhoto


